Set Up SMS Using Twilio
Introduction
This step-by-step guide will walk you through sending an SMS notification using Courier and Twilio. You will:Prerequisites
You will need both Courier and Twilio accounts to complete this tutorial. If you don’t have accounts already, sign up before proceeding.Twilio Onboarding
When creating a Twilio account, Twilio will ask several questions to help customize your experience. Most importantly, Twilio will ask for a project name. You can provide your company name, app name, or something else appropriate (you can always change the project name later). This is necessary because Twilio will assign credentials unique to this project.Add the Twilio Integration
Once logged in to Courier, navigate to the “Integrations” page. Click on the Twilio Integration to configure it. Courier Integrations each require different pieces of information based on the needs of the Integration provider (see the requirements for each in the “Provider Documentation” section of the sidebar to the left). In the case of Twilio, we need an “Account SID,” “Auth Token,” and “Messaging Service SID.” We will retrieve these from Twilio shortly.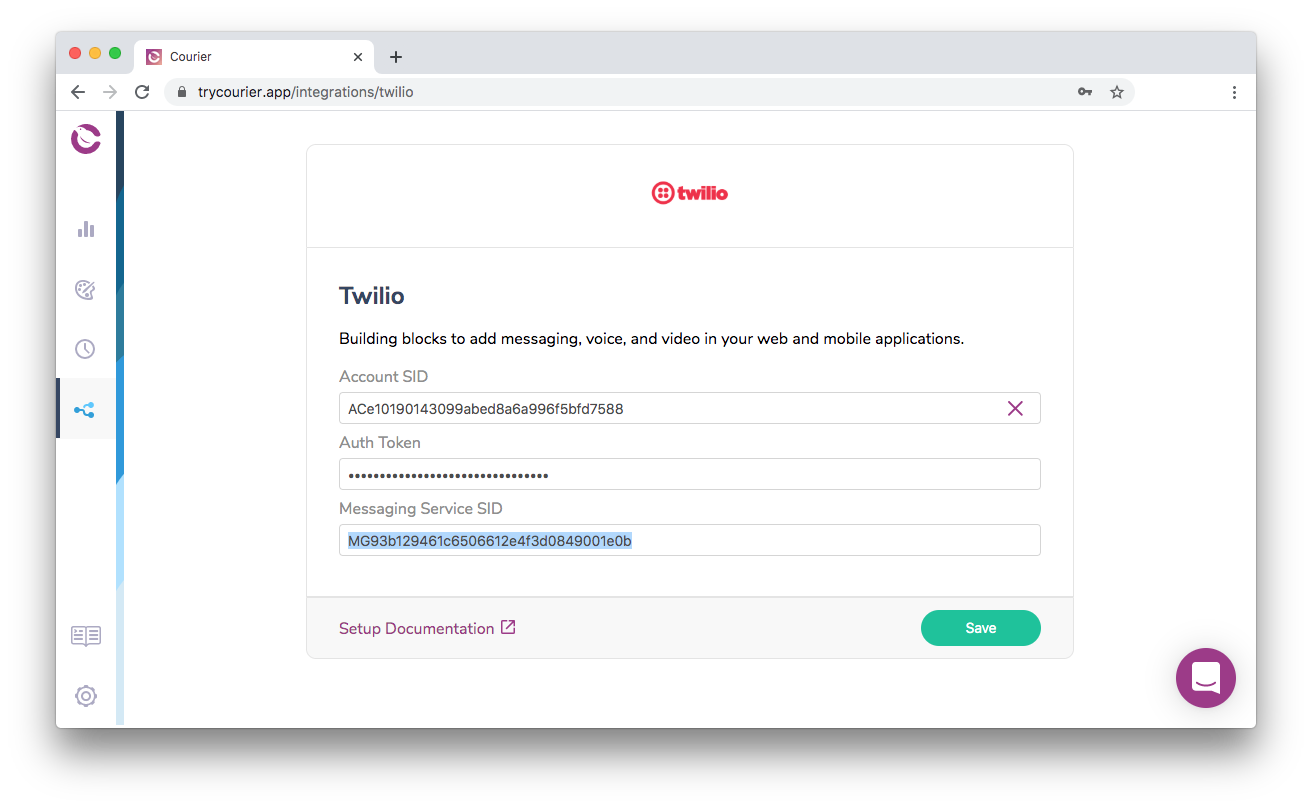
Courier's Twilio Configuration Page
Twilio Account SID and Auth Token
Once logged in to Twilio, navigate to the “Dashboard” by clicking the house icon on the sidebar. This page will display a section labeled “Project Info” with your “Account SID” and “Auth Token.” Paste these into the corresponding fields on Courier’s Twilio Integration page.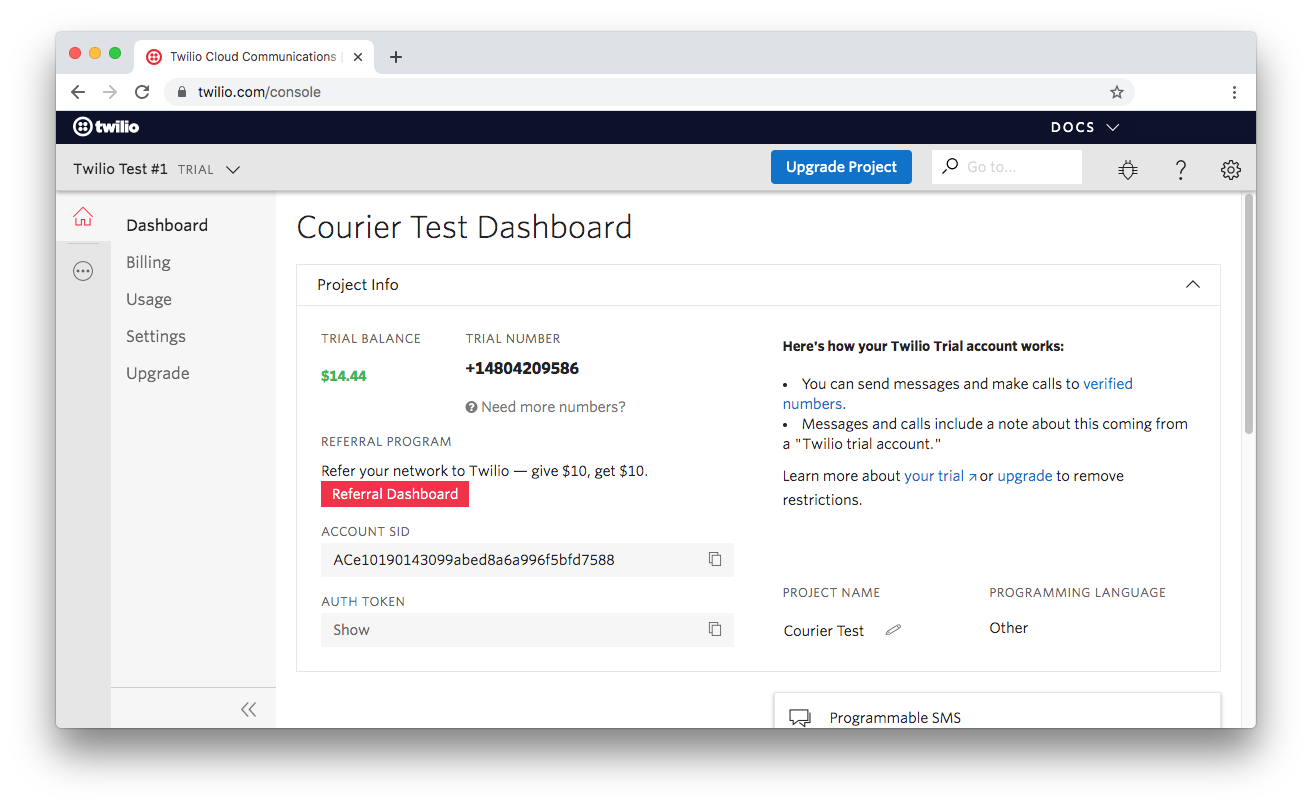
Twilio Authorization Credentials
Twilio Overview
To send messages, we need a Twilio phone number with SMS capabilities and a Twilio Messaging Service. We will walk through the basics together, but Twilio provides excellent documentation of their services as well.Twilio Phone Numbers
First, purchase a Twilio phone number. Navigate to the “Phone Numbers” page of the Twilio console by clicking the circle icon in the sidebar, then ”# Phone Numbers”. Then, click on “Buy a Number”.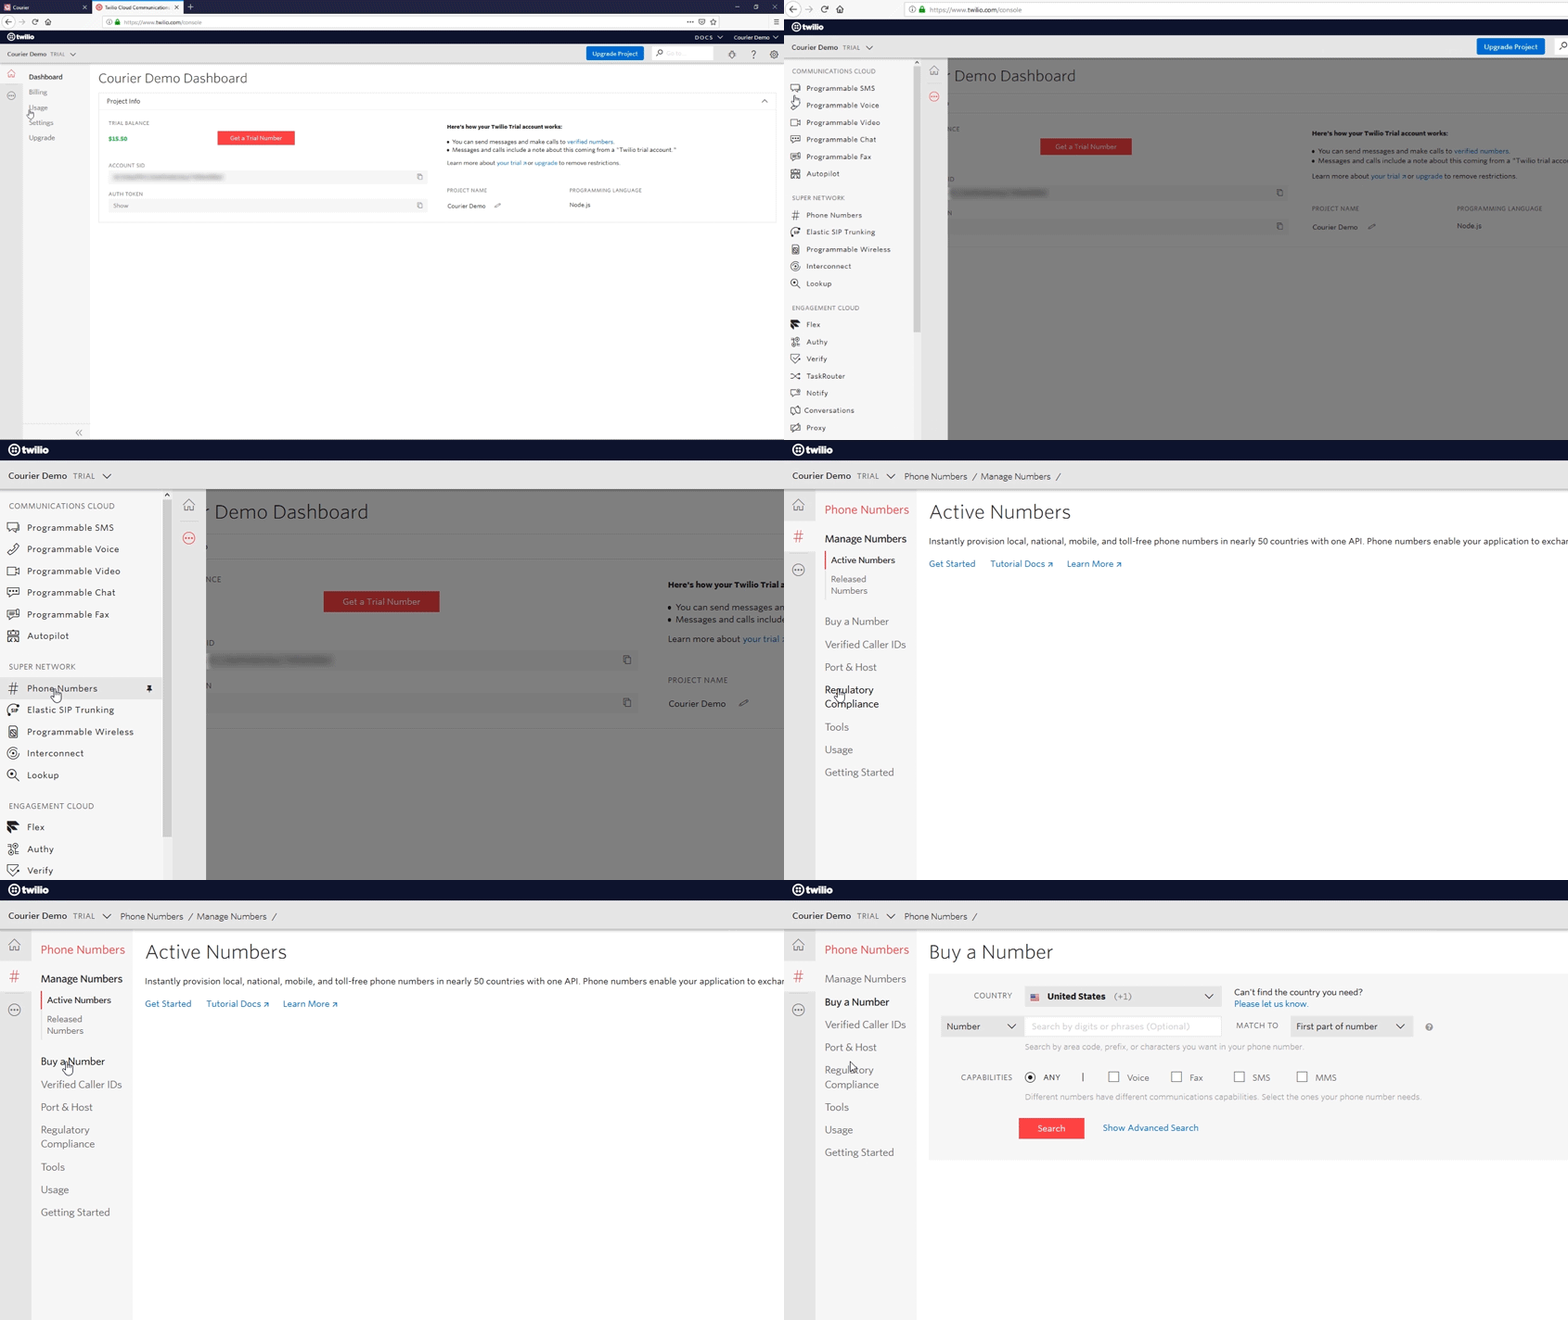
Twilio Phone Number Menu
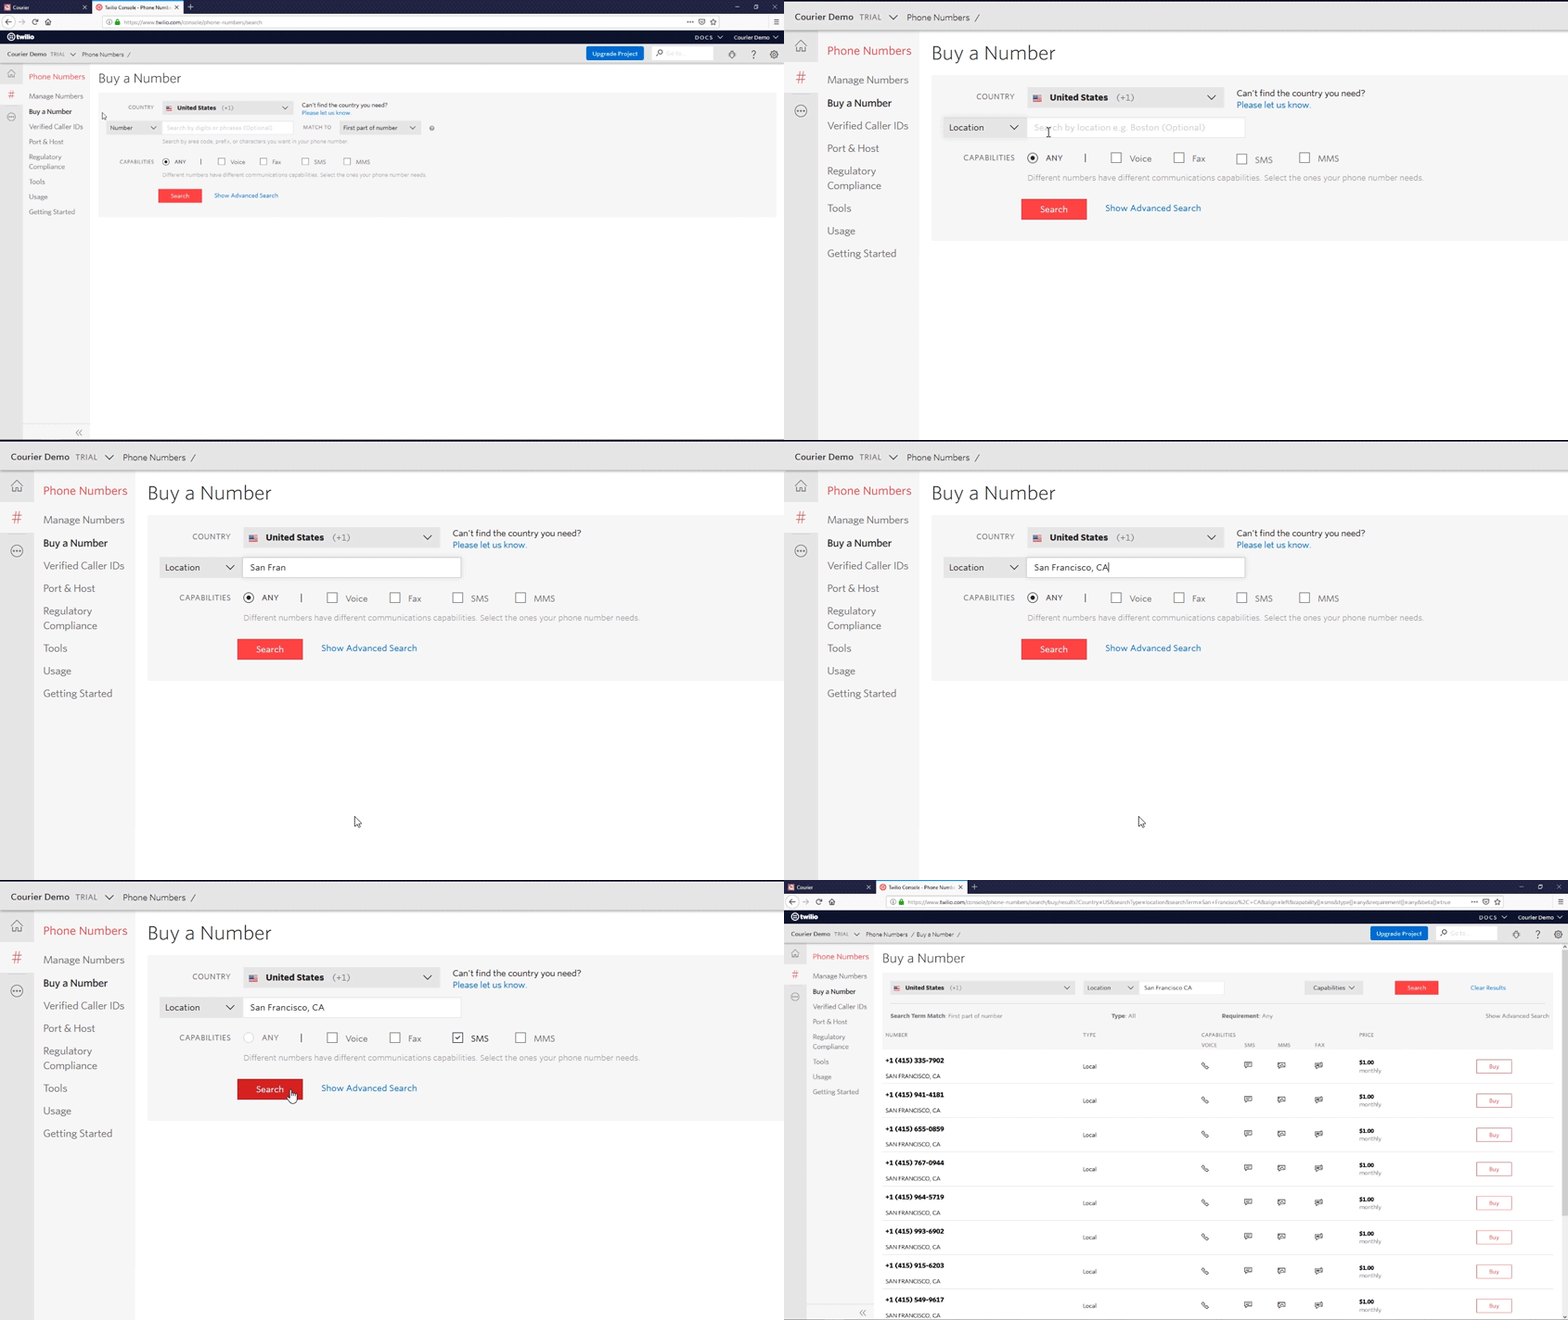
Search for Phone Numbers
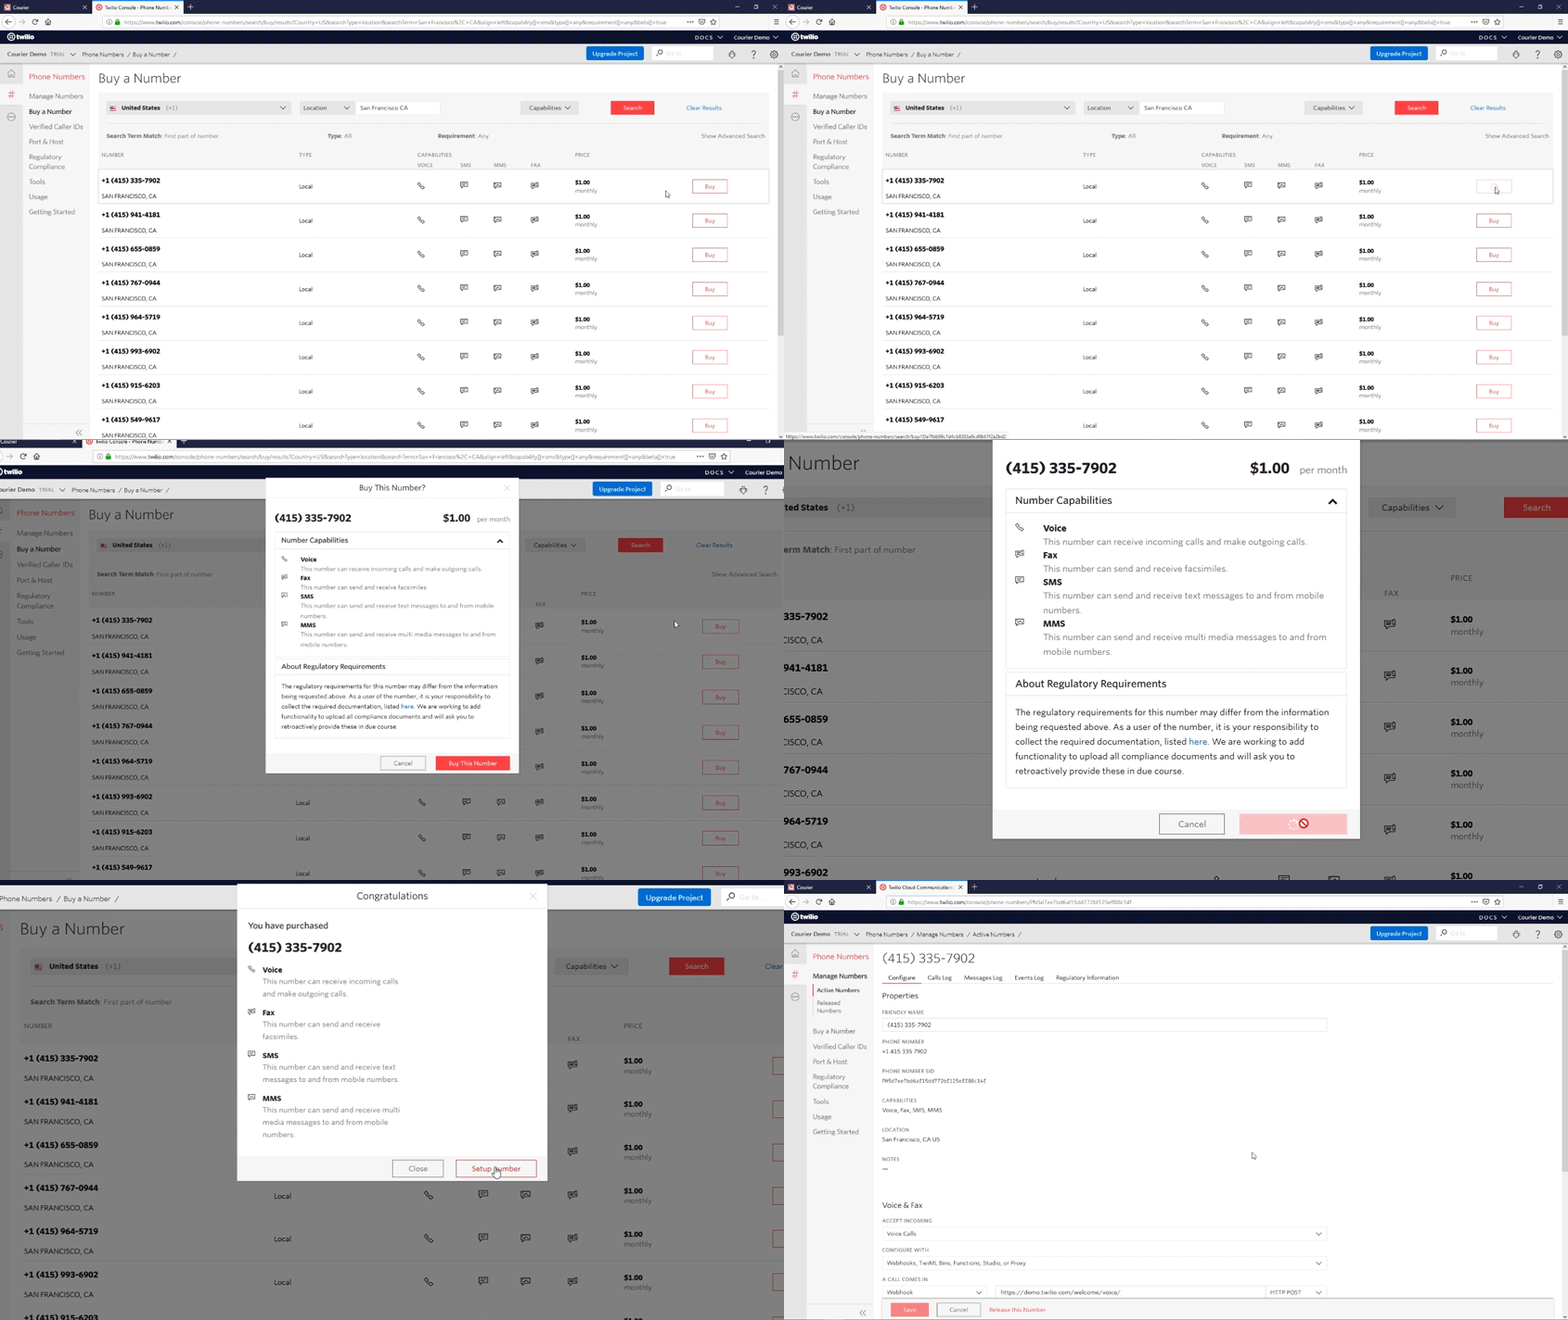
Buy a Phone Number
Twilio Messaging Service
Now that we have a phone number, we need to create a Twilio Messaging Service that uses this number. Navigate to the “Programmable SMS” section of the Twilio console. This will display a Messaging Services dashboard. Navigate to the “SMS” subsection in the sidebar.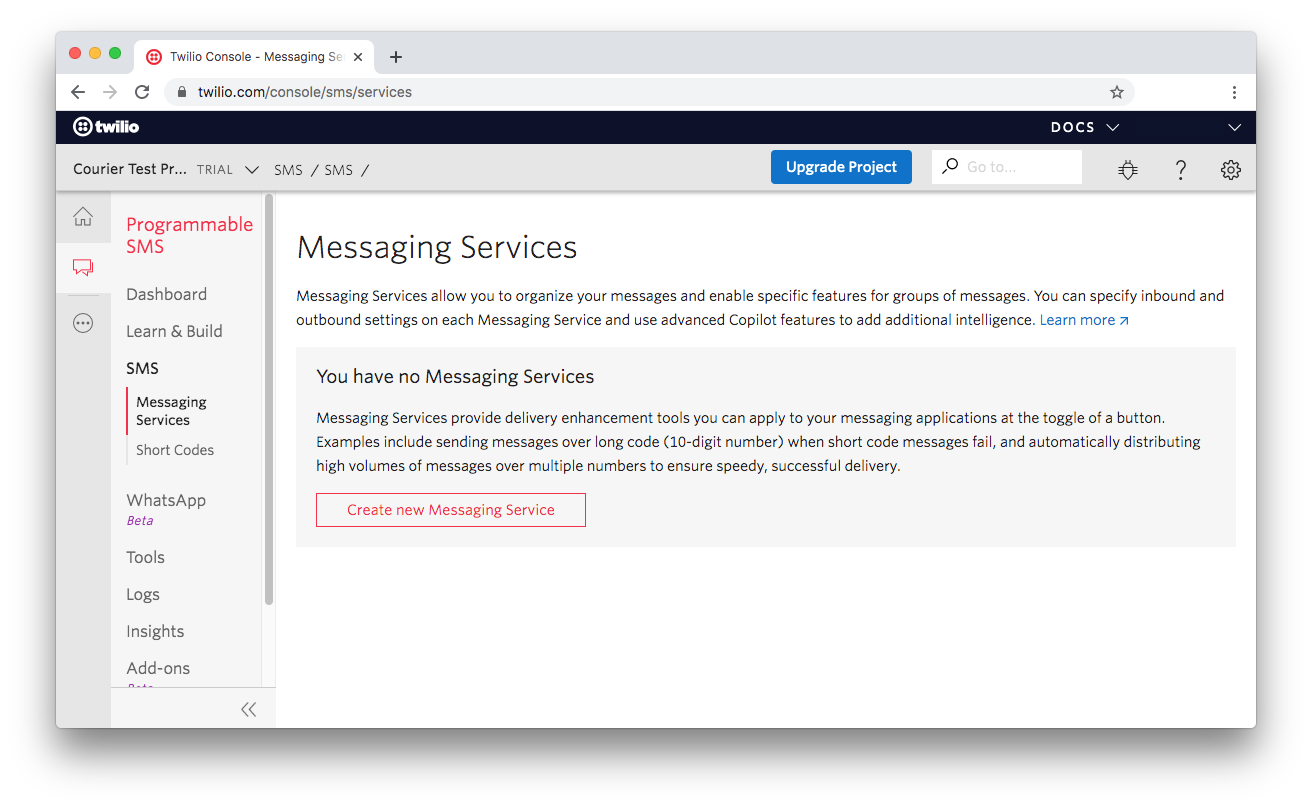
Twilio Messaging Services
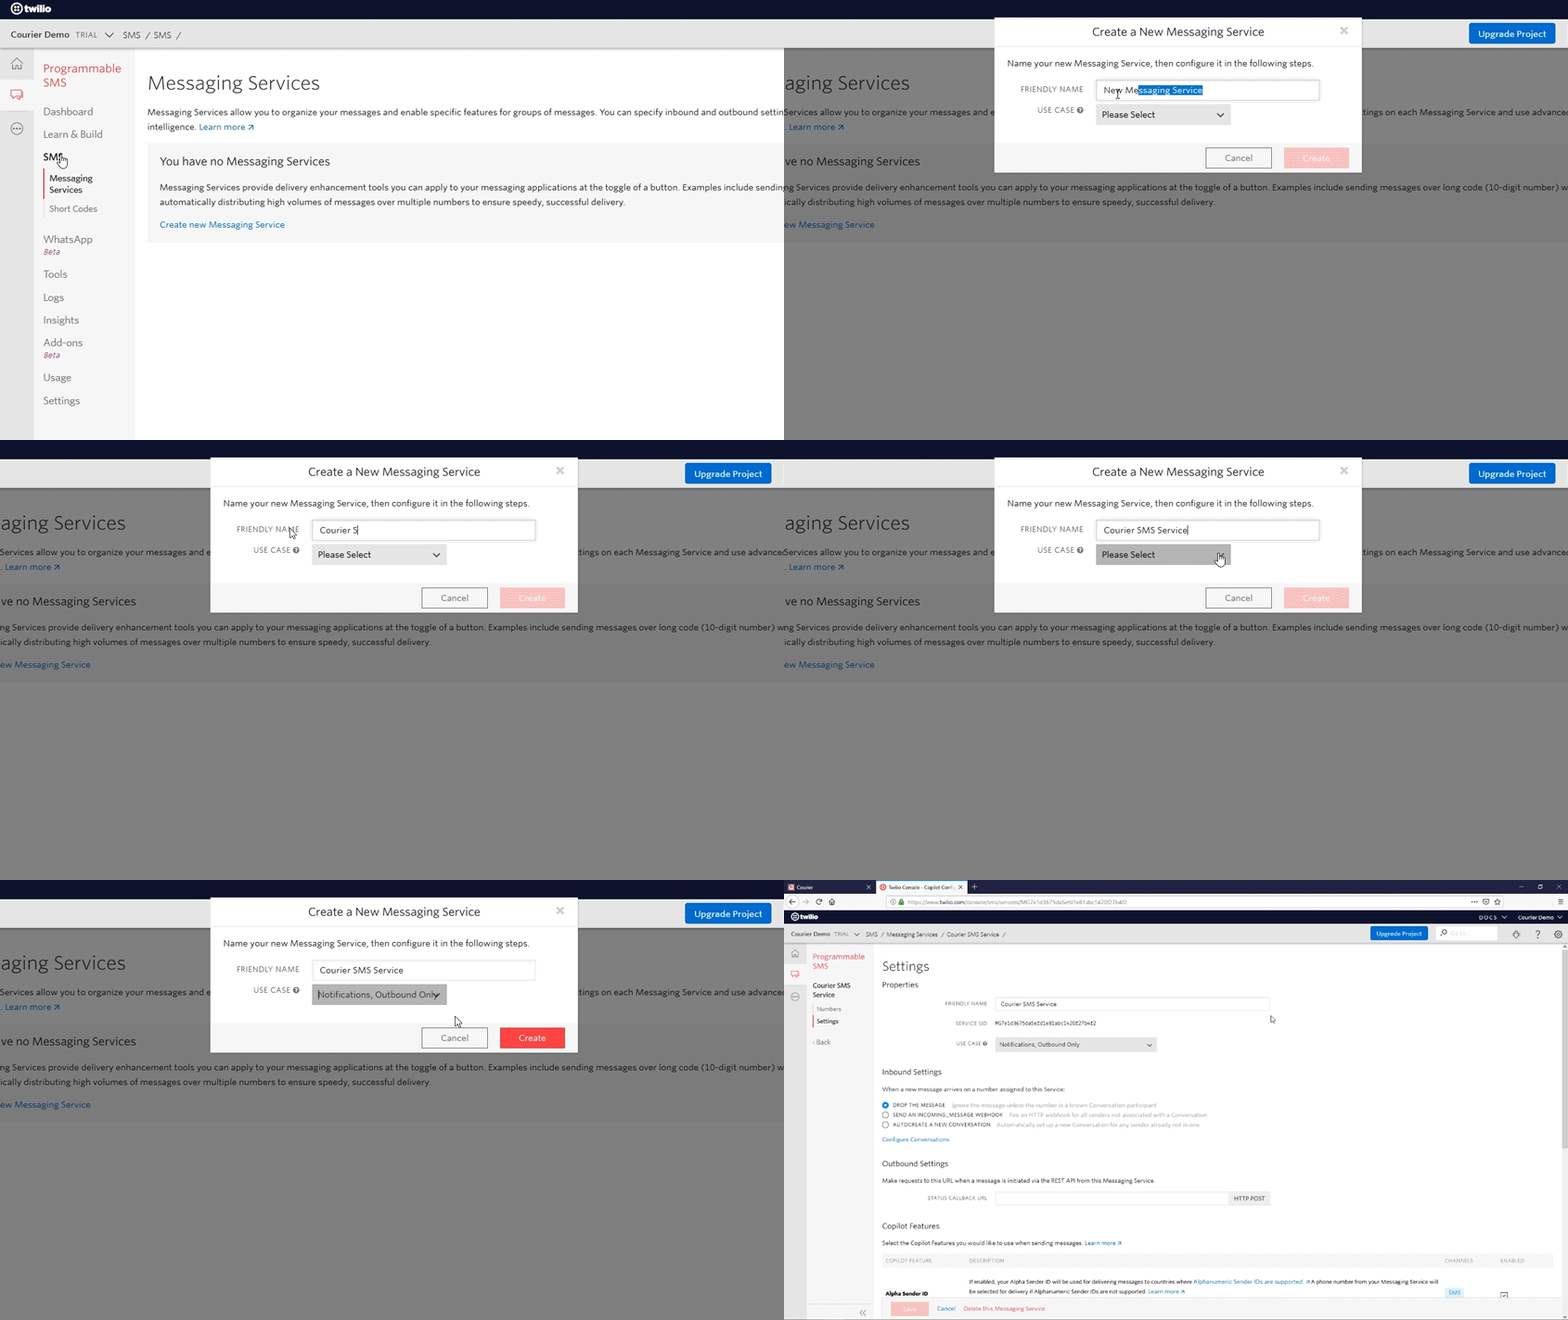
Configure the Messaging Service
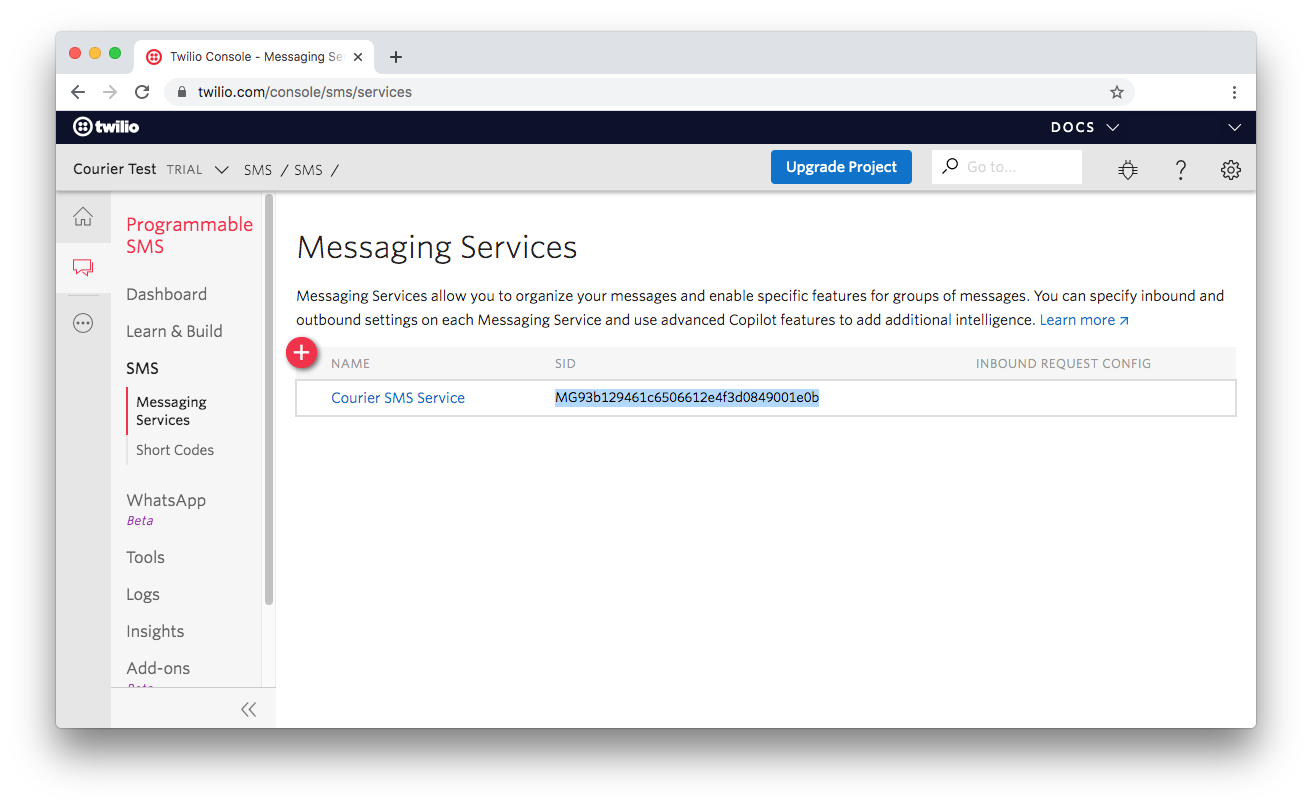
Twilio Service SID
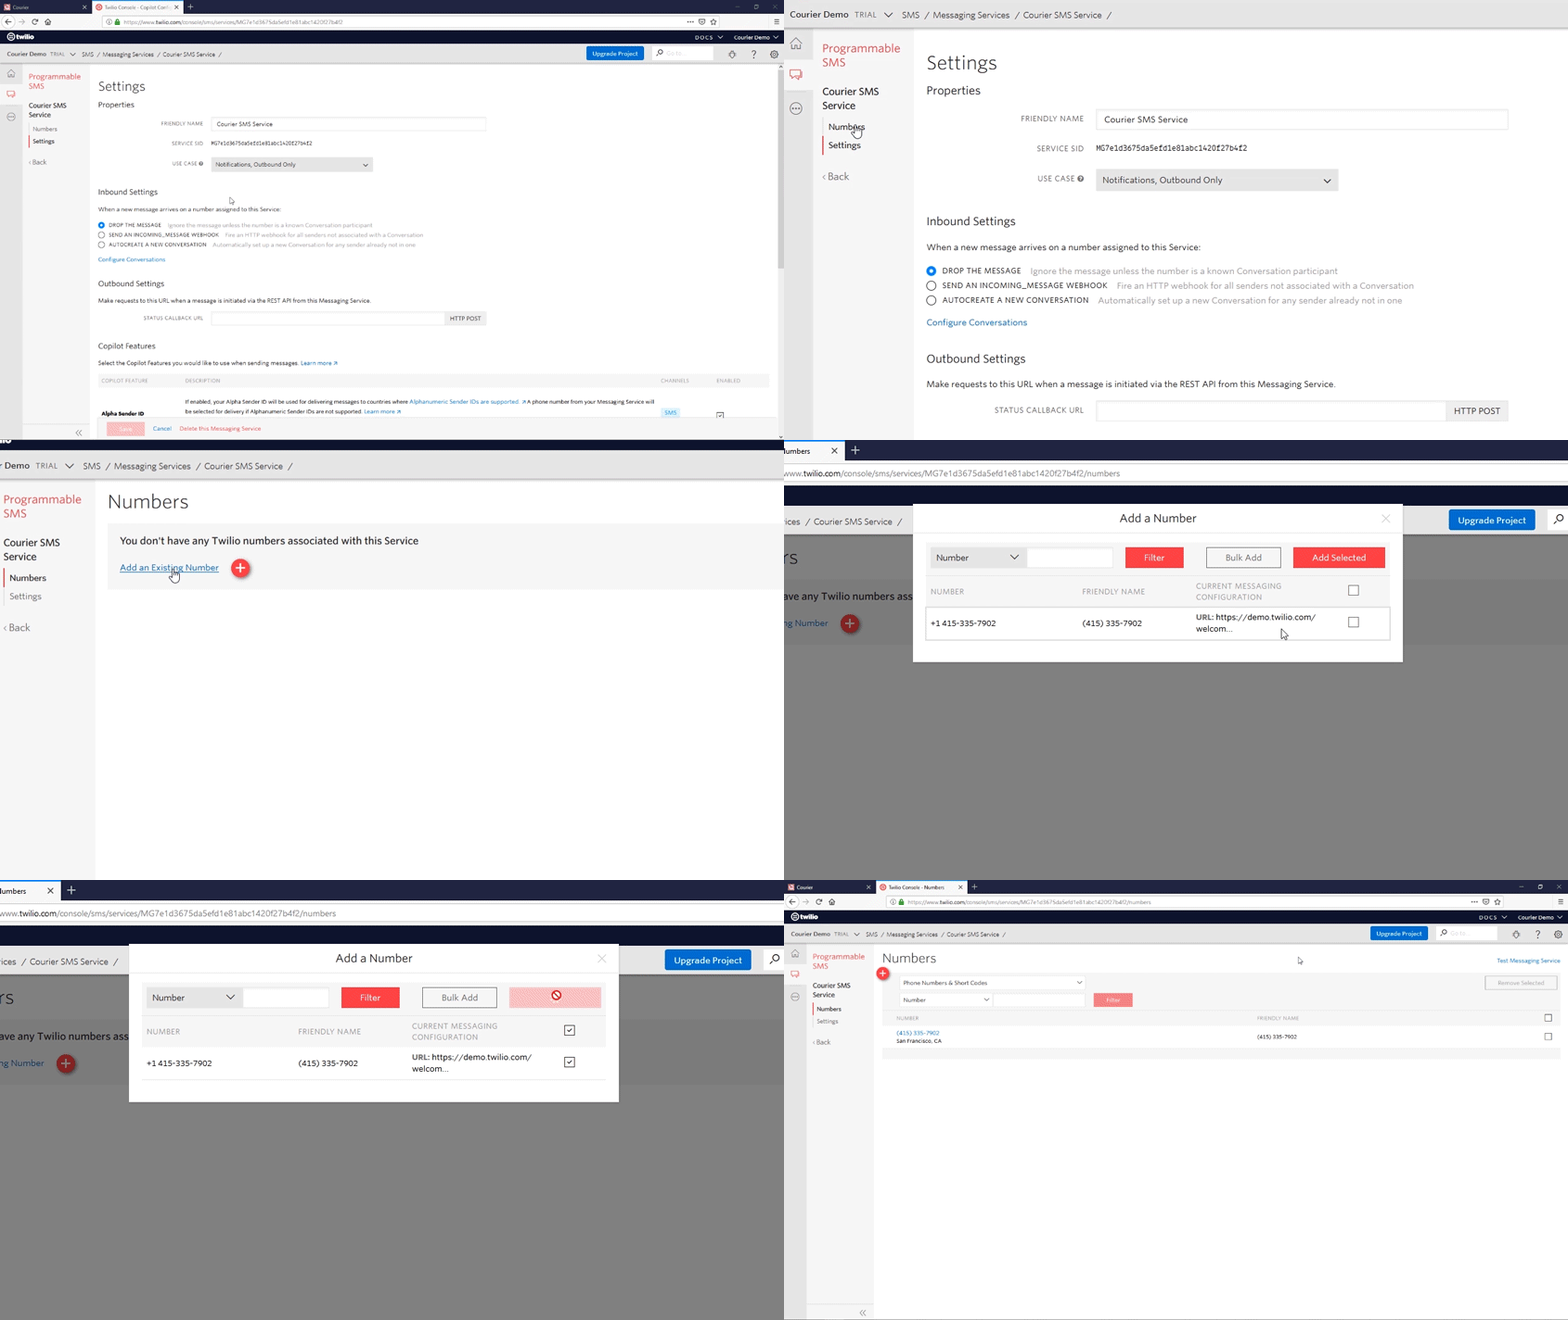
Add a Number to a Messaging Service
Create a Notification
Navigate to the Courier Notifications page and click “Create Notification”. Click on “Untitled Notification” to rename your notification — for this tutorial, call it “Test Appointment Reminder.” From your list of configured Integrations, click on the Twilio button. Then, click the “Twilio” box that has been added to the sidebar in order to bring up an SMS template. You can add message blocks to the template by clicking one of the three icons on the mock-up smartphone. The paper icon adds a text block. The hand icon adds a link. The list icon adds a repeatable list.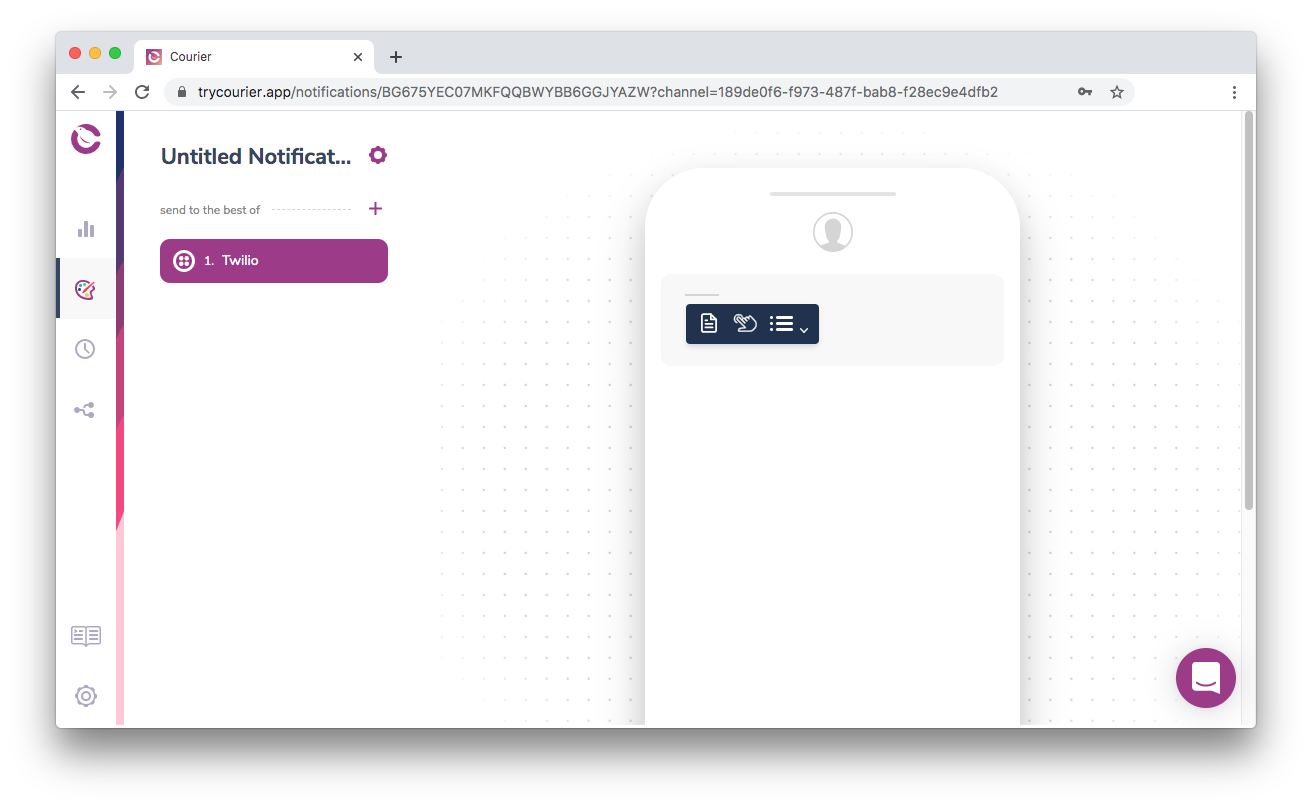
Courier Notification Template
{name} variable (we’ll cover the source of this variable data later in this tutorial).
Finish populating the SMS template with whatever text you want to send. You can also copy the example below, which contains a few variables for demonstration.
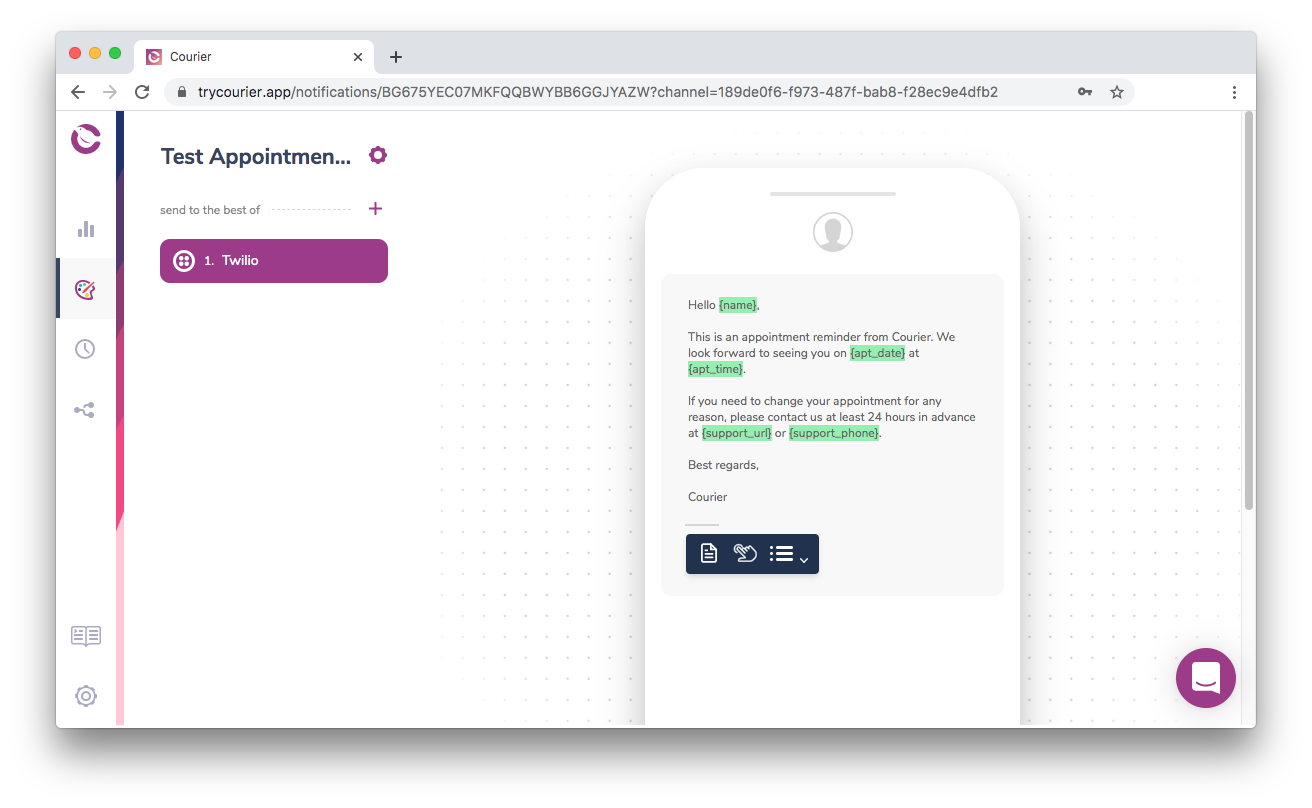
Courier Notification with Sample Message
Send a Message
Courier passes messages to Integrations via the Send endpoint. For this tutorial, we will send our messages with cURL, but you can use your preferred language and HTTP library. You can also use an API testing tool such as Postman or Insomnia. For additional code samples, see the “Courier API Reference”.Authorization
Courier supports both basic and token authorization. For this tutorial, we will use token authorization. You can read more about authorization in Courier’s “Authorization Overview”. We must send anAuthorization header with each request. The Courier Send API also requires an event. The authorization token and event values are the “Auth Token” and “Notification ID” we see in the detail view of our “Test Appointment Reminder” event. Click the gear icon next to the Notification’s name to reveal them.
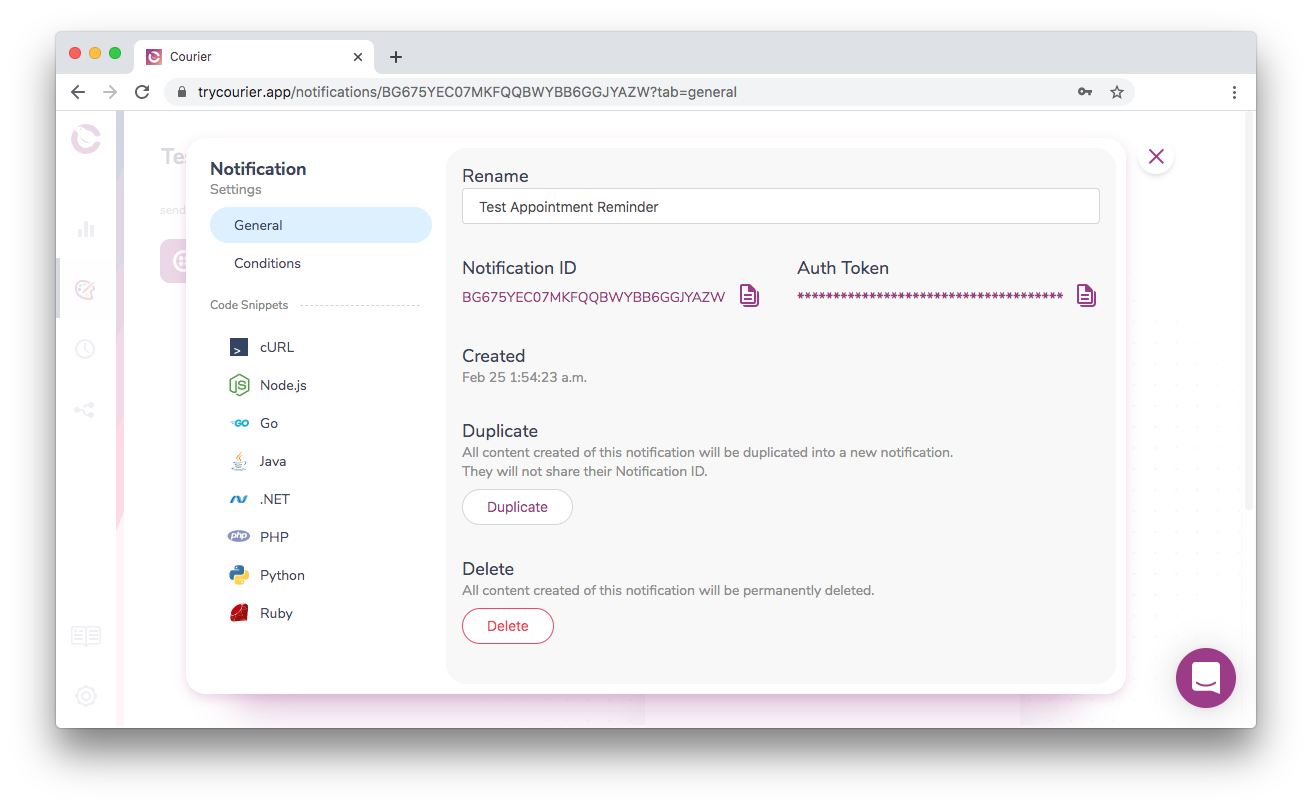
Courier Authorization Credentials
VARIABLE_NAME="<value>". Some examples are provided below. Note that the values are just examples. Do not copy them, and be sure to use the tokens associated with your account instead.
Courier Auth Token Variable
COURIER_AUTH_TOKEN="YpW2yEaMDyNg6agN9yGkc9ycEg8MxiKVTiiu2WVc8"
Notification ID
COURIER_NOTIFICATION_ID="YpW2yEaMDyNg6agN9yGkc9ycEg8"
These variables will persist for as long as your Bash session remains alive. If you quit your terminal, you will need to recreate them. However you handle your authorization tokens, keep them secure, and never add them to source control.
To verify that you created the variables correctly, you can see them by typing echo $VARIABLE_NAME. For example, typing echo $COURIER_AUTH_TOKEN will print the “Courier Auth Token” value to the terminal.
Building the cURL Request
We want to send a POST request tohttps://api.courier.com/send. Let’s build our cURL request line-by-line. First, we’ll tell cURL this is a POST request.
Authorization header using the COURIER_AUTH_TOKEN variable we set earlier. We send this as a Bearer token.
Content-Type header, which is application/json.
--data option. You will often send this data in JSON format. To improve working with cURL, Courier also supports a custom urlencoded format that can be used in the place of JSON. This format allows nested data values using square bracket syntax. This guide provides examples in both formats, so feel free to use the format that you like best.
Our --data option must also contain an event and recipient. Additionally, we will send profile and data objects.
The event value, for this example, is the “Notification ID” that we assigned to our COURIER_NOTIFICATION_ID environment variable earlier.
A recipient should be a unique identifier that does not change. This prevents duplicate entries in the event that a recipient changes their email or some other identifying value. We do not have any recipients in this tutorial, so we can enter any string value. Something like “peter_parker” will work.
The profile information is an object that includes any key-value pairs required by our Integrations. In the case of Twilio, we need a phone_number key and value. This is the phone number where our message will be delivered. You can find the required keys for any Integration by selecting an Integration on the “Integrations” page. See the individual integration provider requirements for details.
Lastly, we define message variables inside the data object. Remember the variables we set in the
visual template editor? This is where we provide the values. Our example message had name,
apt_date, apt_time, support_phone, and support_url variables. For this tutorial, we can
assign example strings to each.
Our --data option should look like this:
- JSON
- cURL
https://api.courier.com/send, to complete the cURL request.
Complete cURL Request in both Formats
- cURL in JSON
- cURL urlencoded
555-616-1962 value with a phone number you can access. Also, note the "'"$COURIER_NOTIFICATION_ID"'" formatting in the JSON formatted --data option. The quotes are necessary to escape the JSON quotes and access the COURIER_NOTIFICATION_ID variable.
Paste your complete cURL request in either format in your terminal and hit “Return.” You should receive a response like {"messageId":"<message id string>"}. You will also receive an SMS at the phone number you specified in the request body. If you do not receive a message, be sure the phone number provided in the profile is an approved number with Twilio. Twilio trial accounts may limit your ability to send messages to unknown numbers.
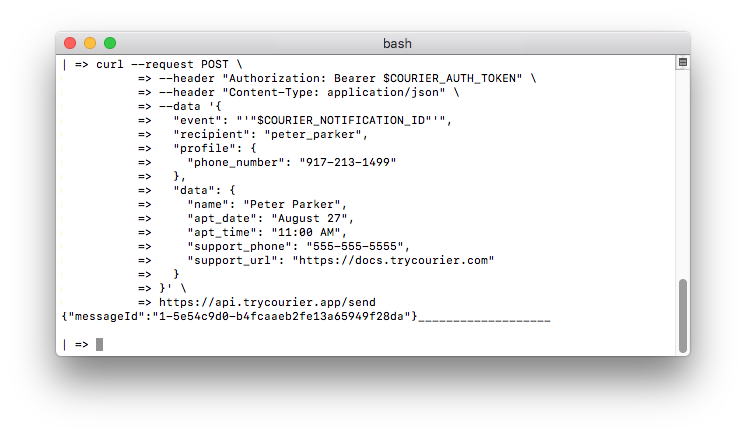
Send the cURL Request
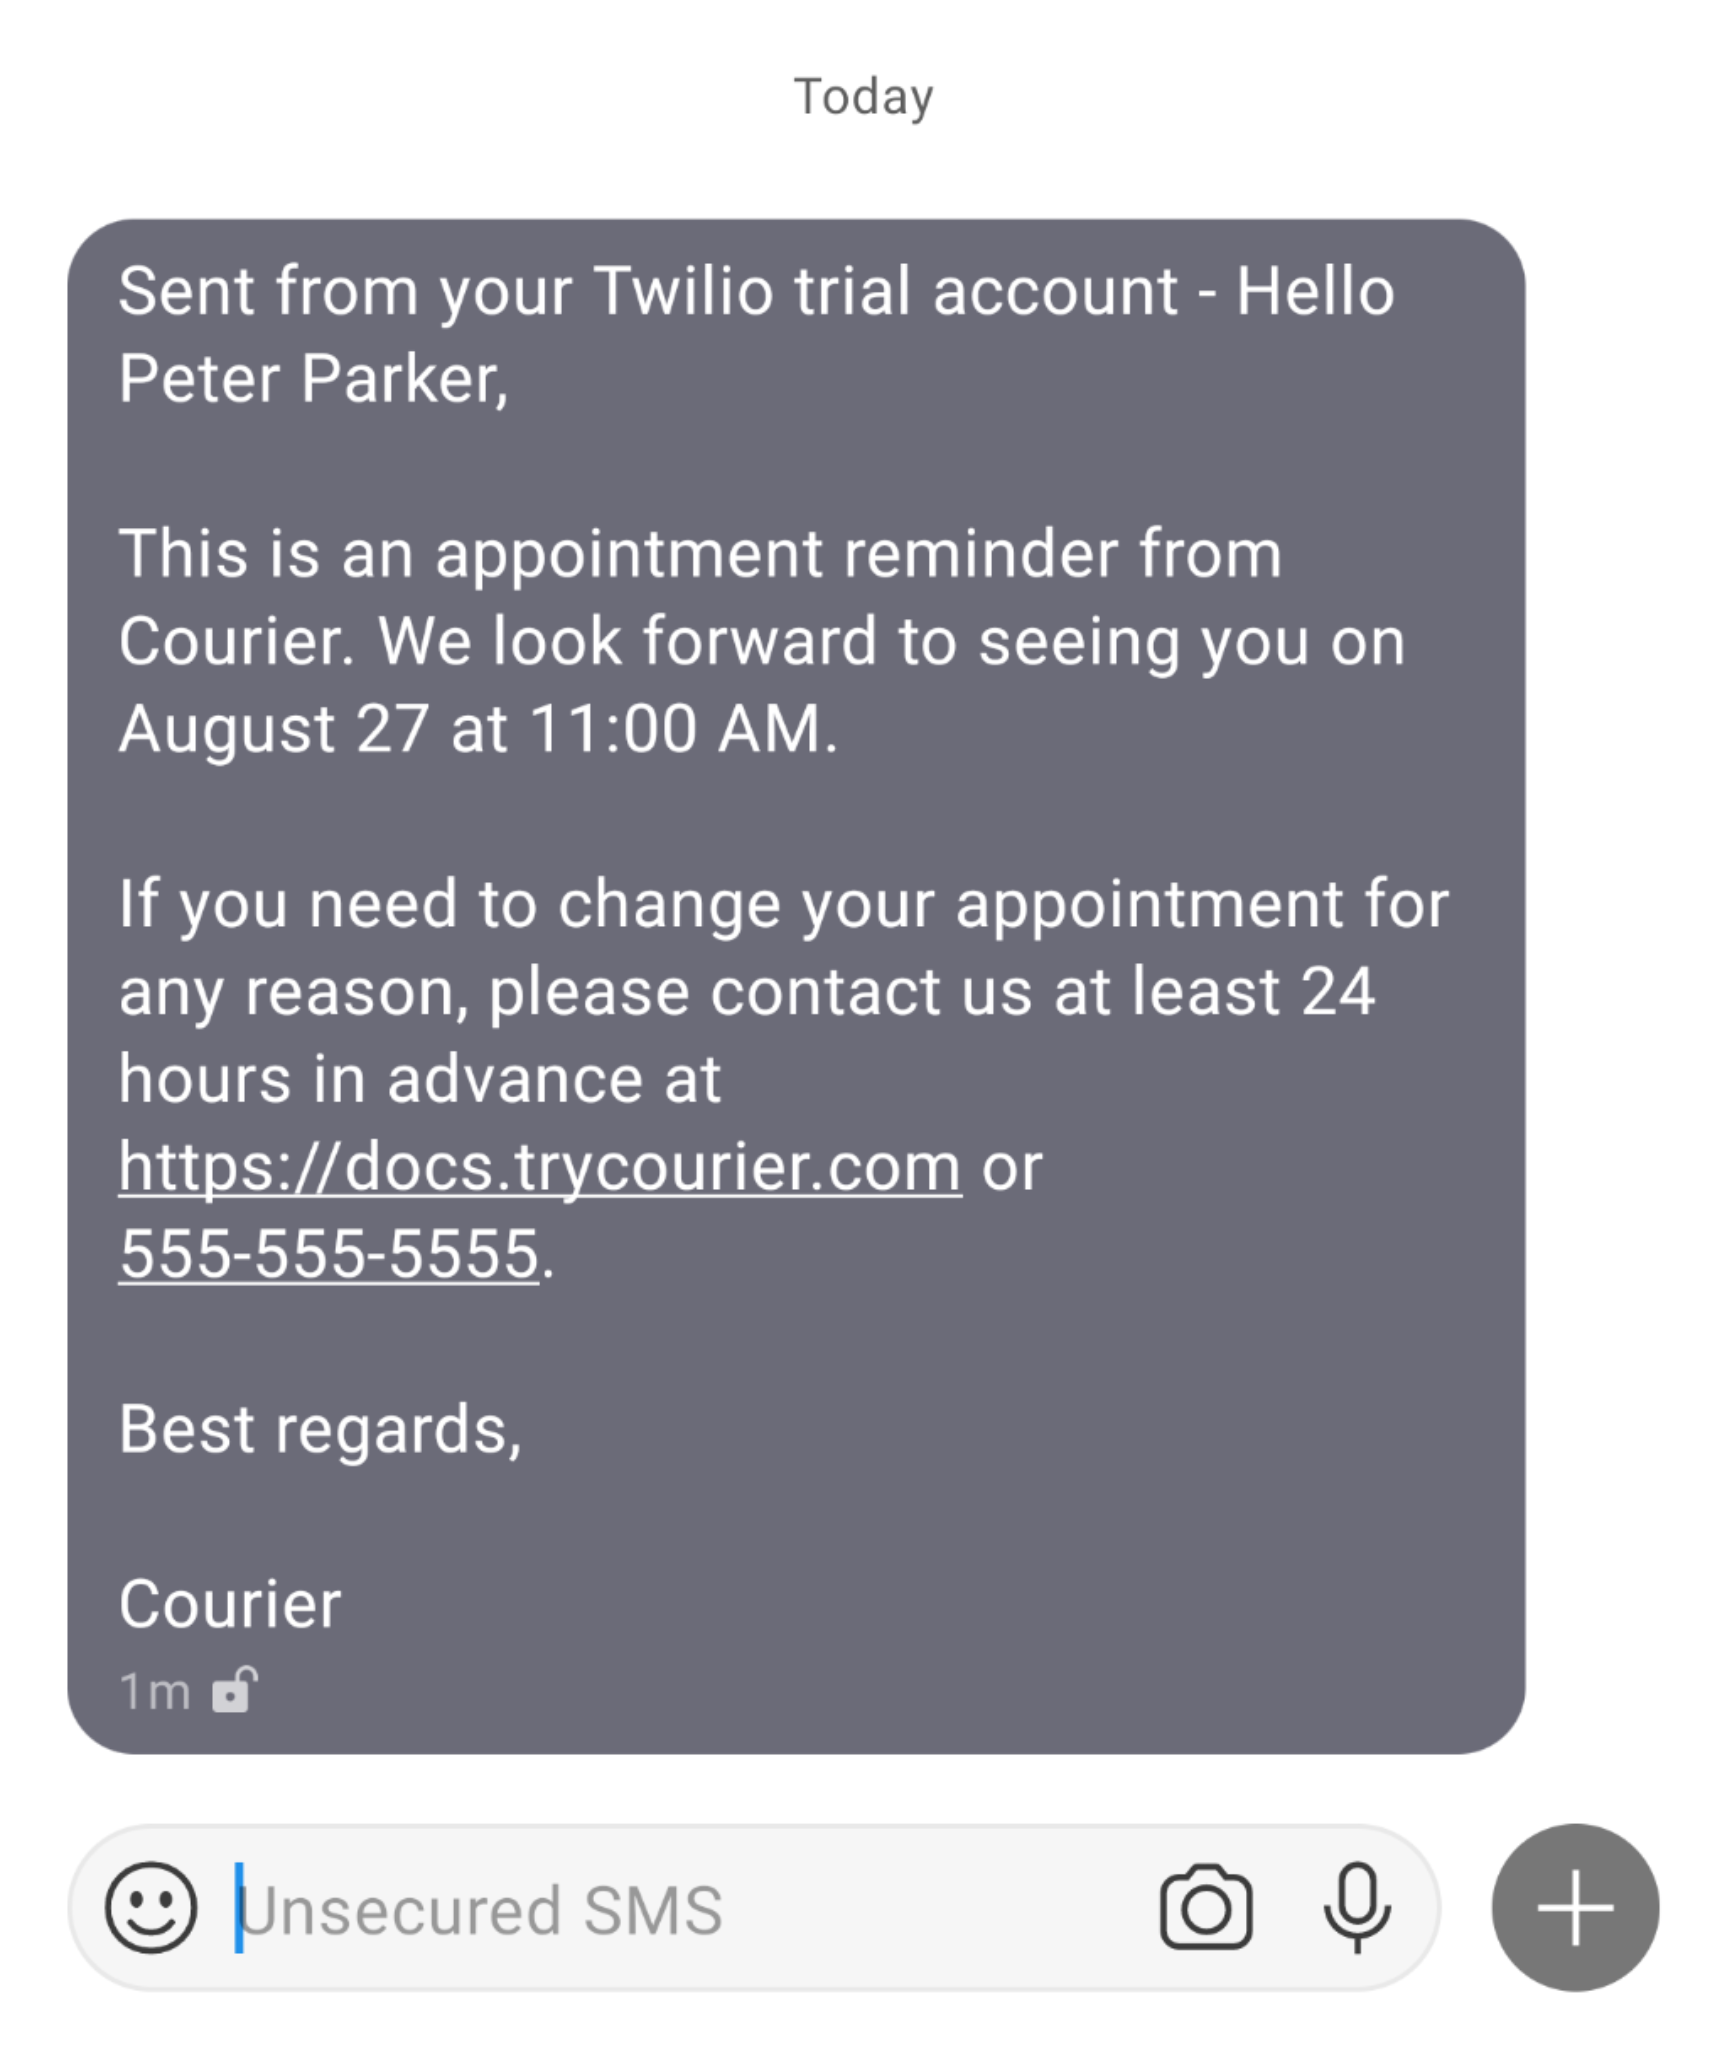
Delivered SMS Message
Profile Requirements
To deliver a message to a recipient over Twilio, Courier must be provided the recipient’s SMS-compatible phone number. This value should be included in the recipient profile asphone_number.
Overrides
TWILIO POLLINGCourier relies on configured credentials for status polling. Using overrides will fail to poll Twilio’s API for status events. Use the Twilio integration without overrides to get sms events.
Messages.json endpoint (see all send request body fields here). Below is an example of overriding the to phone number and the account SID + auth token for the configuration:
Troubleshooting: Twilio Error Codes and Solutions
Error Code 30003: Destination Unavailable
Message failed to deliver due to unreachable destination.- Send another message via REST API or API Explorer
- Check device status, signal strength, and carrier network
- Use “Fallback to Long Code” feature if needed
- Open support request if issue persists
Error Code 30007: Message Filtered
Messages filtered by Twilio or carrier due to policy violations.- Ensure compliance with Twilio’s Messaging and Acceptable Use Policies
- Secure account credentials
- Open support request if you suspect a mistake
Error Code 30005: Unknown or Inactive Destination
Issues with carrier, signal, or inactive number.- Verify number is active and formatted correctly (E.164)
- Check device status and signal
- Test with other devices on same carrier
Error Code 30006: Landline or Unreachable Carrier
Message sent to landline or unreachable carrier.- Use Lookup API to check if number is landline
- Try alternative phone number type
Error Code 30008: Unknown Delivery Failure
Message failed for unknown reasons.- Test with simpler message and different sender ID
- Check device roaming status
- Contact support with recent message SIDs if issue persists
Error 11200: HTTP Retrieval Failure
Failed to retrieve content from given URL.- Verify web server status and accessibility
- Check for network issues
- Ensure proper server configuration for static resources
Error 12300: Invalid Content-Type
Twilio unable to process URL’s Content-Types.- Verify correct Content-Type returned by server
- Ensure URL refers to valid, acceptable resource
Error 20003: Permission Denied
Lack of permission to access requested resource.- Verify correct Auth Token and account SID combination
- Check account type (sub-account vs master, test vs live)
- Confirm API Key and Auth Token are valid
Error 20404: Resource Not Found
Requested resource doesn’t exist or is unavailable.- Check resource exists and API case-sensitivity
- Verify account SID and base URL
Error 21211: Invalid “To” Phone Number
Incorrectly formatted or invalid recipient number.- Ensure E.164 format with correct country code
- Avoid calling/messaging a Twilio number from itself
Error 21408: Permission Not Enabled for Region
Permission not enabled for recipient’s region.- Enable permission in Geo-Permissions settings
Error 21610: SMS STOP Filter
Recipient previously unsubscribed using “STOP” keyword.- Request recipient to text “START” to resubscribe
- Ensure consent for messaging
Error 53000: Signaling Connection Error
Lost or failed signaling communication.- Attempt multiple reconnections
- Try connecting to a different region
Test Credentials Not Working
Test credentials don’t send actual messages or make calls.- For end-to-end testing, use trial credits in a separate project
- In production, use magic number +15005550006 as “From” number
Webhook Not Working
Issues with webhook functionality.- Check error logs for detailed information
- Test webhook in browser, check for HTTP redirects
- Contact Twilio support if unresolved
Video/Audio Not Working
Problems with video or audio transmission.- Check Twilio Status Pages for incidents
- Identify affected parties and regions
- Contact support with detailed information if persistent
Send Message Not Working
Unable to send messages successfully.- If opted out, text “START” or “YES” to opt-in
- Verify recipient number status, reception, and roaming
- Check “do not contact” list
- Contact support with failed message SIDs
Import Twilio Not Working
Issues importing the Twilio library.- Install library correctly:
pip3 install twilio - Check for conflicting
twilio.pyfiles - Verify pip configuration
- Test with sample code snippet